

Mildew growth along the silicone seals in your shower can be an unsightly and stubborn problem. These dark stains thrive in damp, humid environments where moisture lingers, such as bathrooms. Fortunately, there are fast and effective methods for removing mildew, restoring your shower’s appearance, and helping prevent it from returning. Here’s a comprehensive guide to tackling silicone mildew swiftly and safely.
Why Silicone Mildew Happens
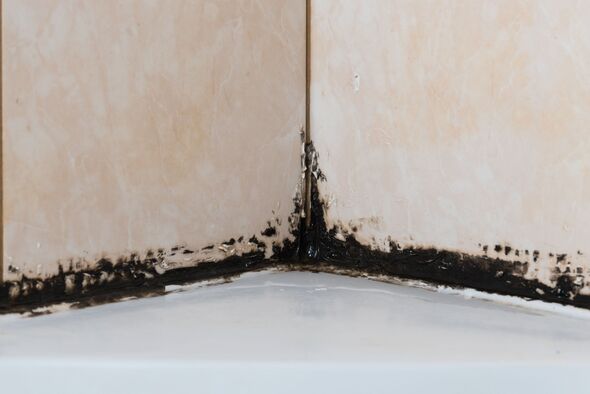
Silicone caulk is a common sealant in showers and tubs because it resists water. However, over time it can accumulate mildew—especially in areas with poor ventilation, infrequent use, or lack of regular cleaning. Mildew begins as tiny dark spots and can spread along seams and corners, producing that familiar musty odor. If left unchecked, it can mar the appearance of your bathroom and even weaken the sealant, allowing water to seep behind tiles.
Safety First: Prepare Before You Clean
Before tackling mildew, take a few precautions:
- Ventilation is crucial. Open windows or switch on an exhaust fan to reduce exposure to cleaning fumes.
- Wear protective gear. Put on rubber gloves and, if sensitivity is an issue, goggles or a mask. Some cleaning agents can irritate skin and eyes.
- Protect surrounding areas. Use old towels or painter’s tape to shield tiles or fixtures from splashes.
Step 1: Loosen the Surface Mildew
For surface-level mildew stains, a homemade cleaning solution is ideal:
- Mix one part bleach or hydrogen peroxide with three parts water, or use an equal mix of white vinegar and water.
- Apply the solution generously with a spray bottle or sponge along the edges of silicone seams.
- Let it sit for 10–15 minutes—this gives it time to penetrate mildew.
Step 2: Scrub Away Stains
Once the cleaning solution has soaked in:
- Use an old toothbrush or a small-bristle brush to scrub gently but firmly.
- Work the bristles along the silicone’s grooves and lines, lifting mildew from its crevices.
- Rinse thoroughly with warm water to clear away loosened residue.
- Repeat steps 1 and 2 if stains are still visible.
Step 3: Deep Clean Through Reapplication
If stains persist:
- Reapply your cleaning mixture—this time undiluted or with a stronger bleach-to-water ratio (2:1).
- Let it sit for 20–30 minutes, keeping the area damp with a lightly misted spray to maintain moisture.
- Scrub again, using an angled brush or plastic scraper for tight spots.
- Rinse and dry thoroughly.
Step 4: Evaluate the Seal – Repair or Replace
After cleaning, inspect the silicone:
- If it has cracks, gaps, separation from surfaces, or remains discolored after heavy cleaning, the seal might be compromised.
- Carefully use a utility knife or caulk removal tool to remove the old silicone, then clean the edges.
- Apply fresh, mildew-resistant silicone sealant designed for bathrooms. Smooth it with a caulk finishing tool or a wet finger for a clean line.
- Allow proper drying time—typically 24 hours—before using the shower again.

Step 5: Prevent Mildew from Returning
Preventing regrowth is just as important as cleaning:
- Improve air flow
Run the exhaust fan during and after showers for 20–30 minutes, and leave the door or window open to let steam escape. - Wipe down after each use
Use a squeegee or towel to remove excess water from walls, floor, and seals. - Clean regularly
Once a week, spray a mild cleaner—vinegar diluted with water or a gentle bathroom product—on seams and rinse after 10 minutes. - Use a mold deterrent spray
There are sprays formulated with antimicrobial agents; use monthly to discourage mold growth. - Consider upgraded sealants
Invest in silicone labeled specifically for bathrooms or mildew-resistant versions—they typically contain fungicides.
If you prefer natural or commercial alternatives, consider:
- Oxygen-based scrub like powdered cleaners containing sodium percarbonate, mixed with warm water to form a paste. Apply, let it sit, then scrub away.
- Specialized mildew removers sold at supermarkets—choose ones safe for silicone and follow the label’s instructions.
- Steam cleaners can be effective due to the high heat. After steaming, wipe with a clean cloth; then dry thoroughly.
For persistent, deep-seated mildew that resists repeated treatments:
- Full seal removal and replacement is often the most reliable fix. Mildew can burrow into microscopic pores of silicone, and replacing the seal eliminates the issue.
- After you remove old silicone, clean the area thoroughly, allow it to dry completely, and apply new mildew-resistant sealant.
- Proper drying after installation is essential to prevent trapping moisture beneath the new seal.
Dealing with shower silicone mildew quickly and thoroughly restores both cleanliness and peace of mind. By combining an effective cleaning process with preventive measures—like ensuring good ventilation, regular maintenance, and using quality sealants—you can keep your shower looking fresh and mildew-free for longer. Whether you’re freshening up old sealant or preventing future problems, these steps can help you take control of mildew in your bathroom.


